 NAPS2 - Organization Use
This page provides technical documentation for using NAPS2 in a organization where installations are centrally managed.
 Deployment
NAPS2 provides an MSI installer for easy deployment via Group Policy. You can find the latest MSI on the download page.
Optional files (for OCR) will be downloaded automatically, but if you would rather deploy them yourself (or the target machine doesn't have internet access) you can place them in these folders:
%APPDATA%\NAPS2\components\tesseract4\fast
%APPDATA%\NAPS2\components\tesseract4\best
Either copy the files from your local installation, or manually download and extract them from Github (Tesseract).
For OCR, you'll need the .traineddata files for each language you want.
You can change where NAPS2 looks for optional files by using the ComponentsPath element in appsettings.xml.
You can configure NAPS2 for your users by deploying application-level configuration files to the NAPS2 installation directory (%PROGRAMFILES(X86)%\NAPS2).
There are two configurable application-level files:
This file stores a list of scanning profiles. It acts as a set of default profiles that new users start with. If no application-level profiles.xml file exists, new users will start with no profiles. Note that once a user makes a change to any profile, changes to the application-level profiles.xml will no longer have any effect for that user. If you'd like to change this behavior, use the LockSystemProfiles element in appsettings.xml.
The user-level profiles are stored in %APPDATA%/NAPS2/profiles.xml. You can use your copy of this file as a base for the application-level profiles.xml (they use the exact same format).
This file stores global configuration information for all users. To make changes, use the default appsettings.xml file as a base and make changes in a text editor. The default content is this:
<?xml version="1.0" encoding="utf-8" ?>
<AppConfig>
  <DefaultCulture></DefaultCulture>
  <StartupMessageTitle></StartupMessageTitle>
  <StartupMessageText></StartupMessageText>
  <StartupMessageIcon>Information</StartupMessageIcon>
  <ShowPageNumbers mode="default">false</ShowPageNumbers>
  <ShowProfilesToolbar mode="default">false</ShowProfilesToolbar>
  <ScanChangesDefaultProfile mode="default">true</ScanChangesDefaultProfile>
  <ScanButtonDefaultAction mode="default">ScanWithDefaultProfile</ScanButtonDefaultAction>
  <SaveButtonDefaultAction mode="default">SaveAll</SaveButtonDefaultAction>
  <DeleteAfterSaving mode="default">false</DeleteAfterSaving>
  <KeepSession mode="default">false</KeepSession>
  <SingleInstance mode="default">false</SingleInstance>
  <HideOcrButton>false</HideOcrButton>
  <HideImportButton>false</HideImportButton>
  <HideSavePdfButton>false</HideSavePdfButton>
  <HideSaveImagesButton>false</HideSaveImagesButton>
  <HideEmailButton>false</HideEmailButton>
  <HidePrintButton>false</HidePrintButton>
  <HideSettingsButton>false</HideSettingsButton>
  <HideDonateButton>false</HideDonateButton>
  <DisableAutoSave>false</DisableAutoSave>
  <LockSystemProfiles>false</LockSystemProfiles>
  <LockUnspecifiedDevices>false</LockUnspecifiedDevices>
  <NoUserProfiles>false</NoUserProfiles>
  <AlwaysRememberDevice>false</AlwaysRememberDevice>
  <NoUpdatePrompt>false</NoUpdatePrompt>
  <NoDebugLogging>false</NoDebugLogging>
  <NoScannerSharing>false</NoScannerSharing>
  <DisableSaveNotifications>false</DisableSaveNotifications>
  <ComponentsPath></ComponentsPath>
  <OcrTimeoutInSeconds>600</OcrTimeoutInSeconds>
  <OcrState>UserConfig</OcrState>
  <OcrDefaultLanguage></OcrDefaultLanguage>
  <OcrDefaultMode>Fast</OcrDefaultMode>
  <OcrDefaultAfterScanning>true</OcrDefaultAfterScanning>
  <ForcePdfCompat>Default</ForcePdfCompat>
  <EsclSecurityPolicy>None</EsclSecurityPolicy>
  <EsclServerCertificatePath></EsclServerCertificatePath>
  <EventLogging>None</EventLogging>
  <DefaultProfileSettings>
    <DriverName>wia</DriverName>
    <UseNativeUI>false</UseNativeUI>
    <PaperSource>Glass</PaperSource>
    <BitDepth>C24Bit</BitDepth>
    <PageSize>Letter</PageSize>
    <PageAlign>Right</PageAlign>
    <Resolution>Dpi100</Resolution>
    <AfterScanScale>OneToOne</AfterScanScale>
    <Brightness>0</Brightness>
    <Contrast>0</Contrast>
    <EnableAutoSave>false</EnableAutoSave>
    <MaxQuality>false</MaxQuality>
    <Quality>75</Quality>
    <ExcludeBlankPages>false</ExcludeBlankPages>
    <BlankPageWhiteThreshold>70</BlankPageWhiteThreshold>
    <BlankPageCoverageThreshold>25</BlankPageCoverageThreshold>
    <BrightnessContrastAfterScan>false</BrightnessContrastAfterScan>
    <WiaOffsetWidth>false</WiaOffsetWidth>
    <ForcePageSize>false</ForcePageSize>
    <FlipDuplexedPages>false</FlipDuplexedPages>
    <TwainImpl>Default</TwainImpl>
  </DefaultProfileSettings>
  <KeyboardShortcuts>
    <!-- Many elements here -->
  </KeyboardShortcuts>
</AppConfig>
Some elements support a "mode" attribute that can be either "default" or "lock". If "default", the setting will be the initial value for a new user. If "lock", the setting will be forced to the specified value and the user won't be able to change it.
If you'd like to specify NAPS2's default language to be something other than the machine default, use the DefaultCulture element with a language tag (e.g. "en-US" for US English, "de-DE" for German).
Example:
<DefaultCulture>de-DE</DefaultCulture>
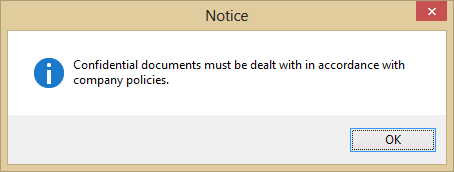
If you'd like users to see a message every time users start NAPS2 (e.g. to remind them of regulatory requirements), use the StartupMessage elements.
StartupMessageTitle: An optional string that will be displayed as the message box window's title.
StartupMessageText: The message text to be displayed. If not specified, no message box window is displayed at startup.
StartupMessageIcon: The message box window's icon name. Possible values: "None", "Information", "Warning".
Example:
<StartupMessageTitle>Notice</StartupMessageTitle>
<StartupMessageText>Confidential documents must be dealt with in accordance with company policies.</StartupMessageText>
<StartupMessageIcon>Information</StartupMessageIcon>
If you'd like to change the default values in the "Settings" window, you can use these elements. You can also set mode="lock" to force a particular setting and prevent the user from changing it.
ShowPageNumbers: If true, show page numbers below each scanned image.
ShowProfilesToolbar: If true, show a toolbar with shortcuts for one-click scanning with each profile.
ScanChangesDefaultProfile: If true, clicking the arrow beside the "Scan" button and selecting a profile will change the default profile to be used the next time the "Scan" button is clicked.
ScanButtonDefaultAction: Possible values: "ScanWithDefaultProfile", "AlwaysPrompt". Changes what clicking the "Scan" button does.
SaveButtonDefaultAction: Possible values: "SaveAll", "SaveSelected", "AlwaysPrompt", "PromptIfSelected". Changes what the "Save PDF", "Save Images", and "Email PDF" buttons do. Note that "SaveSelected" will act the same as "SaveAll" if no images are selected.
DeleteAfterSaving: If true, images are deleted after they're saved to avoid accidental duplication.
KeepSession: If true, scanned images are saved on disk when closing NAPS2 and restored the next time NAPS2 is opened.
SingleInstance: If true, allows only one instance of NAPS2 to run at a time. Trying to start a second instance will focus the first one instead.
Example:
<ShowPageNumbers mode="default">true</ShowPageNumbers>
<ShowProfilesToolbar mode="default">true</ShowProfilesToolbar>
<ScanChangesDefaultProfile mode="default">true</ScanChangesDefaultProfile>
<ScanButtonDefaultAction mode="default">AlwaysPrompt</ScanButtonDefaultAction>
<SaveButtonDefaultAction mode="default">AlwaysPrompt</SaveButtonDefaultAction>
<DeleteAfterSaving mode="default">true</DeleteAfterSaving>
<KeepSession mode="lock">false</KeepSession>
<SingleInstance mode="default">true</SingleInstance>
If you'd like to hide some of the toolbar buttons, use these elements. Also see OCR State.
Example:
<HideImportButton>true</HideImportButton>
<HideOCRButton>true</HideOCRButton>
<HideSavePdfButton>true</HideSavePdfButton>
<HideSaveImagesButton>true</HideSaveImagesButton>
<HideEmailButton>true</HideEmailButton>
<HidePrintButton>true</HidePrintButton>
If you'd like to hide the Donate button in the About window, or disable the donation prompt displayed after a month of use, use this element.
Note that the donation prompt (but not the button) is disabled by default in the MSI distribution.
Example:
<HideDonateButton>true</HideDonateButton>
If you'd like to disable the Auto Save feature due to privacy or security concerns, use the DisableAutoSave element.
Example:
<DisableAutoSave>true</DisableAutoSave>
If you'd like to have more control over user profiles, use the LockSystemProfiles element. With this enabled, users will be unable to edit or delete the profiles specified in the application-level profiles.xml, and such profiles can be updated at any time by the administrator.
By default, if the scanning device is not specified in a profile, users will be able to set it themselves. You can use the AlwaysRememberDevice element to automatically set the device when the profile is first used. If you would prefer to force users to always select the device when scanning, use the LockUnspecifiedDevices element.
Example:
<LockSystemProfiles>true</LockSystemProfiles>
If you have LockSystemProfiles enabled and would like the user to always be prompted to choose a device (rather than being able to specify one in the profile), you can use the use the LockUnspecifiedDevices element.
Example:
<LockUnspecifiedDevices>true</LockUnspecifiedDevices>
If you have LockSystemProfiles enabled and would like the user to be unable to create or use custom profiles, use the NoUserProfiles element.
Example:
<NoUserProfiles>true</NoUserProfiles>
If you would like profiles that don't have a specified device to remember the selected device when they are first used, use the AlwaysRememberDevice element.
Example:
<AlwaysRememberDevice>true</AlwaysRememberDevice>
If you don't want users to be prompted to update tesseract when they click the OCR button, use the NoUpdatePrompt element.
Example:
<NoUpdatePrompt>true</NoUpdatePrompt>
If you don't want save notifications (the small popup in the bottom right after saving), use the DisableSaveNotifications element.
Example:
<DisableSaveNotifications>true</DisableSaveNotifications>
If you want to change where NAPS2 looks for components (i.e. tesseract ocr files), use the ComponentsPath element. If the user doesn't have write permissions on the selected folder, you'll need to make sure you deploy all the necessary files yourself.
If not specified, the default path is %APPDATA%\NAPS2\components.
Example:
<ComponentsPath>%PROGRAMFILES(X86)%\NAPS2\components</ComponentsPath>
If you want to change the amount of time allowed for OCR (per page), use the OcrTimeoutInSeconds element. The default is 60 seconds.
Example:
<OcrTimeoutInSeconds>120</OcrTimeoutInSeconds>
If you'd like to force OCR to be enabled or disabled, use the OcrState element. Possible values: "UserConfig", "Enabled", "Disabled".
You probably want to deploy language files if you set it to Enabled.
Example:
<OcrState>Disabled</OcrState>
If you'd like to set a default language for OCR, use the OcrDefaultLanguage element with a language code. Reference: http://www.loc.gov/standards/iso639-2/php/code_list.php.
If OcrState is Enabled and a default language is set, it will override any user preference for language.
Example:
<OcrDefaultLanguage>eng</OcrDefaultLanguage>
If you'd like to force saved PDFs to use the PDF/A format, use this element with a value other than Default. Possible values: "Default", "PdfA1B", "PdfA2B", "PdfA3B", "PdfA3U".
Example:
<ForcePdfCompat>PdfA1B</ForcePdfCompat>
ESCL clients (as used by selecting "ESCL Driver" in the profile window) and servers (as used with Scanner Sharing) generally support both HTTPS and HTTP. NAPS2 will prefer to use HTTPS but HTTP will be used if HTTPS doesn't work or isn't available.
To force HTTPS to be used (and show an error otherwise), you can set a security policy of "RequireHttps". You can also force clients to only accept trusted TLS certificates with "RequireTrustedCertificate", but this isn't generally recommended as most ESCL scanners use self-signed certificates.
Example:
<EsclSecurityPolicy>RequireHttps</EsclSecurityPolicy>
Scanner Sharing normally uses a auto-generated self-signed TLS certificate for HTTPS connections. To provide your own certificate, set this to the path of a ".pfx" or ".crt" file. For ".crt" file (which doesn't include the private key), the private key must be registered in the Windows Certificate Store.
Example:
<EsclServerCertificatePath>C:\Somewhere\mycert.pfx</EsclServerCertificatePath>
If you'd like events to be written to the Windows Event Log, use this element with a value other than None. Possible values: "None", "All", "Scan", "Save", "Email", "Print". Separate multiple values with a space.
On each computer you want to use event logging, you must first run NAPS2 with the command NAPS2.exe /CreateEventSource /Silent and administrator permissions.
Example:
<EventLogging>All</EventLogging>
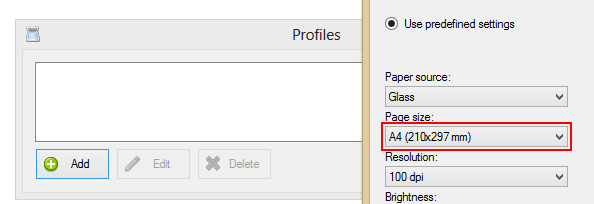
If you'd like to customize the default settings used when users create a new profile, you can change the DefaultProfileSettings elements.
DriverName: The driver to use to connect to the scanner. Possible values: "wia", "twain".
UseNativeUI: Whether to use the native scanning UI (rather than the profile's detailed settings).
Brightness, Contrast: -1000 to 1000
BitDepth: "C24Bit" (color), "Grayscale", "BlackWhite".
PageAlign: "Left", "Center", "Right".
PageSize: "Letter", "Legal", "A5", "A4", "A3", "B5", "B4", "Custom"
Resolution: "Dpi100", "Dpi150", "Dpi200", "Dpi300", "Dpi400", "Dpi600", "Dpi800", "Dpi1200"
PaperSource: "Glass", "Feeder", "Duplex"
Example:
...
<PageSize>A4</PageSize>
...
If PageSize is "Custom", you must also add a CustomPageSize element. A CustomPageSizeName element is optional. For example:
...
<PageSize>Custom</PageSize>
<CustomPageSizeName>Letter</CustomPageSizeName>
<CustomPageSize>
  <Width>8.5</Width>
  <Height>11</Height>
  <Unit>Inch</Unit>
</CustomPageSize>
...
Possible values for Unit: "Inch", "Centimetre", "Millimetre"
Back to Support